Today I will walk you through the integration of Hibernate with a Spring MVC application using annotations. In this particular blog, we will create a simple Hello World application in Spring and Hibernate. Our objective for today's discussion id to create a simple registration form using spring'stage, the data is to persist in a MySql database and after that, we will retrieve the data from the database and will show the data in table form.
Spring MVC and Hibernate Integration CRUD with MavenDatabaseThe very first step to start an application is creating a database, lets create a database with name 'beingjavaguys_db' and create a 'USER' table in it. To create database simply copy the script below and run it in your 'query editor'. This will create a database and table with required fields.
- DROP TABLE IF EXISTS `USER`;
- /*!40101 SET @saved_cs_client = @@character_set_client */;
- /*!40101 SET character_set_client = utf8 */;
- CREATE TABLE `USER` (
- `user_id` int(11) NOT NULL AUTO_INCREMENT,
- `first_name` varchar(45) DEFAULT NULL,
- `last_name` varchar(45) DEFAULT NULL,
- `gender` varchar(45) DEFAULT NULL,
- `city` varchar(45) DEFAULT NULL,
- PRIMARY KEY (`user_id`)
- )
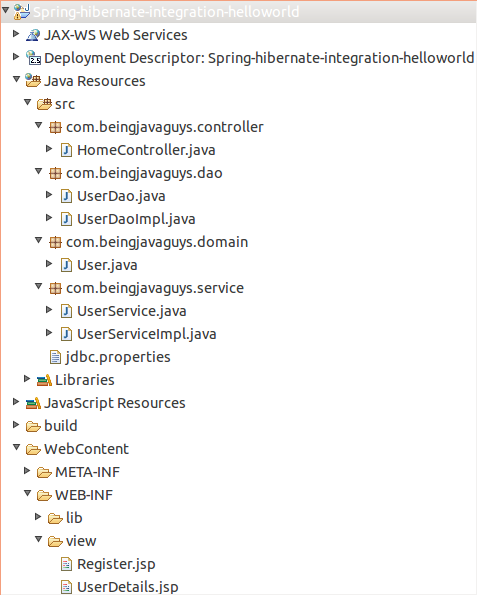
Project Structure Before we start adding some code to our application lets take a look at overall project structure. Create a simple 'web application' project in 'Eclipse' and add all code files to it as mentioned in rest part of this blog.
/WebContent/WEB-INF/web.xmlFirst of all add some entries to your 'web.xml' so that the 'tomcat container' could understand the behavior of application. Add a servlet entry point for 'DispatcherServlet' to make the container understand that all spring configuration is done in it and going to be used accordingly. Now add 'url-mapping' to 'DispatcherServlet' , this tells the container that all requests with /'.html' extention are going to be handled by spring itself. At the end of the file a entry for welcome file is added that indicates the starting point of the application.
- <?xml version="1.0" encoding="UTF-8"?>
- <web-app version="2.5" xmlns="http://java.sun.com/xml/ns/javaee"
- xmlns:xsi="http://www.w3.org/2001/XMLSchema-instance"
- xsi:schemaLocation="http://java.sun.com/xml/ns/javaee http://java.sun.com/xml/ns/javaee/web-app_2_5.xsd">
-
- <servlet>
- <servlet-name>dispatcher</servlet-name>
- <servlet-class>org.springframework.web.servlet.DispatcherServlet</servlet-class>
- <load-on-startup>1</load-on-startup>
- </servlet>
-
- <servlet-mapping>
- <servlet-name>dispatcher</servlet-name>
- <url-pattern>*.html</url-pattern>
- </servlet-mapping>
-
- <welcome-file-list>
- <welcome-file>index.jsp</welcome-file>
- </welcome-file-list>
-
- </web-app>
/WebContent/index.jspIn 'index.jsp' a 'SendRedirect' is added that redirects the control to '/register.html' so that spring could take the command from this point.
- <%@page import="com.sun.mail.iap.Response"%>
- <%@ page language="java" contentType="text/html; charset=UTF-8"
- pageEncoding="UTF-8"%>
- <%response.sendRedirect("register.html"); %>
- <!DOCTYPE html PUBLIC "-//W3C//DTD HTML 4.01 Transitional//EN" "http://www.w3.org/TR/html4/loose.dtd">
/src/com/beingjavaguys/controller/HomeController.javaWe have added a controller with name 'Home Controller' and configured it using required mappings. '@Controller' tells that the class is going to be used as a controller for the application. '@RequestMapping' tells that the method will behave like an action for the mentioned 'url pattern'. Whenever a request pattern will match to the pattern specified in '@RequestMapping' the code written in related method will be executed. Here you can see that the every action is returning an object of 'ModelAndView' class. 'ModelAndView' class offers a number of things to the application, the very first parameter that is passed to it, represents the name of view(required jsp file) that is going to be rendered after completion of action's code. The second parameter indicated a String value key for the object that is placed as third parameter. Using these capabilities we can send an object to view associated with a key.
- package com.beingjavaguys.controller;
- import java.util.ArrayList;
- import java.util.HashMap;
- import java.util.Map;
- import org.springframework.beans.factory.annotation.Autowired;
- import org.springframework.stereotype.Controller;
- import org.springframework.validation.BindingResult;
- import org.springframework.web.bind.annotation.ModelAttribute;
- import org.springframework.web.bind.annotation.RequestMapping;
- import org.springframework.web.servlet.ModelAndView;
- import com.beingjavaguys.domain.User;
- import com.beingjavaguys.service.UserService;
-
- @Controller
- public class HomeController {
-
- @Autowired
- private UserService userService;
-
-
- @RequestMapping("/register")
- public ModelAndView getRegisterForm(@ModelAttribute("user") User user,
- BindingResult result) {
-
- ArrayList<String> gender = new ArrayList<String>();
- gender.add("Male");
- gender.add("Female");
-
- ArrayList<String> city = new ArrayList<String>();
- city.add("Delhi");
- city.add("Kolkata");
- cit.add("Chennai");
- city.add("Bangalore");
-
- Map<String, Object> model = new HashMap<String, Object>();
- model.put("gender", gender);
- model.put("city", city);
-
- System.out.println("Register Form");
- return new ModelAndView("Register", "model", model);
-
- }
-
-
- @RequestMapping("/saveUser")
- public ModelAndView saveUserData(@ModelAttribute("user") User user,
- BindingResult result) {
-
- userService.addUser(user);
- System.out.println("Save User Data");
- return new ModelAndView("redirect:/userList.html");
-
- }
-
-
- @RequestMapping("/userList")
- public ModelAndView getUserList() {
-
- Map<String, Object> model = new HashMap<String, Object>();
- model.put("user", userService.getUser());
- return new ModelAndView("UserDetails", model);
-
- }
-
- }
/src/com/beingjavaguys/dao/UserDao.javaDAO stand for data access object, it makes it easy to communicate the application with database. We are using an interface here this implements standard industrial practices. Required methods are declared here and being implemented in related implementation class associated with it.
- package com.beingjavaguys.dao;
-
- import java.util.List;
- import com.beingjavaguys.domain.User;
-
-
- public interface UserDao {
- public void saveUser ( User user );
- public List<User> getUser();
-
- }
/src/com/beingjavaguys/dao/UserDaoImpl.javaThis is implementation class for UserDao interface, all methods declared in UserDao interface are implemented here to achieve the goal. 'saveUser()' method takes an User's object as parameter and persists it in the database using 'sessionFactory' object. Similarly 'getUser()' method is returning a list of User's object using a Hibernate Criteria query.
- package com.beingjavaguys.dao;
-
- import java.util.List;
- import org.hibernate.SessionFactory;
- import org.springframework.beans.factory.annotation.Autowired;
- import org.springframework.stereotype.Repository;
- import com.beingjavaguys.domain.User;
-
-
- @Repository("userDao")
- public class UserDaoImpl implements UserDao {
-
-
- @Autowired
- private SessionFactory sessionfactory;
-
-
- @Override
- @Transactional
- public void saveUser(User user) {
- sessionfactory.getCurrentSession().saveOrUpdate(user);
- }
-
-
- @Override
- @Transactional
- public List<User> getUser() {
-
- @SuppressWarnings("unchecked")
- List<User> userlist = sessionfactory.getCurrentSession()
- .createCriteria(User.class).list();
- return userlist;
-
- }
-
- }
/src/com/beingjavaguys/domain/User.javaTo represent User entity within the application and to persist User's objects we uses a User class with all required fields. This is nothing but a simple java bean with some Hibernate annotations. @Entity tells that the class is a domain class that maps to a table in the database. The name attribute of '@Table' specifies the table name in the database. @Id tells that the related column is going to represent the 'primary key' for the table and @GeneratedValue show auto increment nature for related column. The name attribute of '@Column' specifies the related column name for the field.
- package com.beingjavaguys.domain;
-
- import javax.persistence.Column;
- import javax.persistence.Entity;
- import javax.persistence.GeneratedValue;
- import javax.persistence.Id;
- import javax.persistence.Table;
-
-
- @Entity
- @Table(name = "USER")
- public class User {
-
-
-
- @Id
- @GeneratedValue
- @Column(name = "user_id")
- private int id;
-
-
-
- @Column(name = "first_name")
- private String firstName;
-
-
- @Column(name = "last_name")
- private String lastName;
-
-
- @Column(name = "gender")
- private String gender;
-
-
-
- @Column(name = "city")
- private String City;
-
-
- public int getId() {
- return id;
- }
-
-
- public void setId(int id) {
- this.id = id;
-
- }
-
-
- public String getFirstName() {
- return firstName;
-
- }
-
-
- public void setFirstName(String firstName) {
- this.firstName = firstName;
-
- }
-
-
- public String getLastName() {
- return lastName;
-
- }
-
-
- public void setLastName(String lastName) {
- this.lastName = lastName;
- }
-
-
- public String getGender() {
- return gender;
-
- }
-
-
- public void setGender(String gender) {
- this.gender = gender;
-
- }
-
-
- public String getCity() {
- return City;
- }
-
-
- public void setCity(String city) {
- City = city;
- }
- }
/src/com/beingjavaguys/service/UserService.javaService layer is added here to implement two layer architecture for the application, it works some kind of interface in between the application and database transactions. Its always a good practice to have a service layer in your application so that the application data can be isolated to database code and reusability can be enhanced.
- package com.beingjavaguys.service;
-
- import java.util.List;
- import com.beingjavaguys.domain.User;
- public interface UserService {
- public void addUser(User user);
- public List<User> getUser();
-
- }
/src/com/beingjavaguys/service/UserServiceImpl.javaThis is implementation for UserService interface, service methods are called in application controlled to perform database stuff.
- package com.beingjavaguys.service;
- import java.util.List;
- import org.springframework.beans.factory.annotation.Autowired;
- import org.springframework.stereotype.Service;
- import org.springframework.transaction.annotation.Propagation;
- import org.springframework.transaction.annotation.Transactional;
- import com.beingjavaguys.dao.UserDao;
- import com.beingjavaguys.domain.User;
-
-
- @Service
- @Transactional(propagation = Propagation.SUPPORTS, readOnly = true)
- public class UserServiceImpl implements UserService {
-
-
- @Autowired
- UserDao userDao;
- @Override
- public void addUser(User user) {
- userDao.saveUser(user);
-
- }
-
-
- @Override
- public List<User> getUser() {
- return userDao.getUser();
-
- }
- }
/src/jdbc.propertiesA property class is added here to specify all required database properties in a separated file, show_sql=true make all database queries to show on console.
- database.driver=com.mysql.jdbc.Driver
- database.url=jdbc:mysql://localhost:3306/beingjavaguys_db
- database.user=root
- database.password=root
- hibernate.dialect=org.hibernate.dialect.MySQL5Dialect
- hibernate.show_sql=true
- hibernate.hbm2ddl.auto=create/update
/WebContent/WEB-INF/dispatcher-servlet.xmlDispatcher servlet is the root of an spring application, all spring configurations goes here is a single file. The 'jspViewResolver' bean specifies the view files path and its prefix and suffix attributes makes it easy to use simple view names in application rather that specifying full path.
- <?xml version="1.0" encoding="UTF-8"?>
- <beans xmlns="http://www.springframework.org/schema/beans"
- xmlns:xsi="http://www.w3.org/2001/XMLSchema-instance" xmlns:context="http://www.springframework.org/schema/context"
- xmlns:tx="http://www.springframework.org/schema/tx"
- xsi:schemaLocation="
- http://www.springframework.org/schema/beans
- http://www.springframework.org/schema/beans/spring-beans-3.0.xsd
- http://www.springframework.org/schema/context
- http://www.springframework.org/schema/context/spring-context-3.0.xsd
- http://www.springframework.org/schema/tx
- http://www.springframework.org/schema/tx/spring-tx-3.0.xsd">
-
- <context:property-placeholder location="classpath:jdbc.properties" />
- <context:component-scan base-package="com.beingjavaguys" />
- <tx:annotation-driven transaction-manager="hibernateTransactionManager" />
- <bean id="jspViewResolver"
- class="org.springframework.web.servlet.view.InternalResourceViewResolver">
- <property name="viewClass"
- value="org.springframework.web.servlet.view.JstlView" />
- <property name="prefix" value="/WEB-INF/view/" />
- <property name="suffix" value=".jsp" />
- </bean>
-
- <bean id="dataSource"
- class="org.springframework.jdbc.datasource.DriverManagerDataSource">
- <property name="driverClassName" value="${database.driver}" />
- <property name="url" value="${database.url}" />
- <property name="username" value="${database.user}" />
- <property name="password" value="${database.password}" />
- </bean>
-
- <bean id="sessionFactory"
- class="org.springframework.orm.hibernate3.annotation.AnnotationSessionFactoryBean">
- <property name="dataSource" ref="dataSource" />
- <property name="annotatedClasses">
- <list>
- <value>com.beingjavaguys.domain.User</value>
- </list>
- </property>
- <property name="hibernateProperties">
- <props>
- <prop key="hibernate.dialect">${hibernate.dialect}</prop>
- <prop key="hibernate.show_sql">${hibernate.show_sql}</prop>
- </props>
- </property>
- </bean>
-
-
-
- <bean id="hibernateTransactionManager"
- class="org.springframework.orm.hibernate3.HibernateTransactionManager">
- <property name="sessionFactory" ref="sessionFactory" />
- </bean>
-
- </beans>
/WebContent/WEB-INF/view/Register.jsp
- <%@ page language="java" contentType="text/html; charset=UTF-8"
- pageEncoding="UTF-8"%>
- <%@ taglib uri="http://www.springframework.org/tags/form" prefix="form"%>
- <%@ taglib uri="http://java.sun.com/jsp/jstl/core" prefix="c"%>
- <!DOCTYPE html PUBLIC "-//W3C//DTD HTML 4.01 Transitional//EN" "http://www.w3.org/TR/html4/loose.dtd">
- <html>
- <head>
- <meta http-equiv="Content-Type" content="text/html; charset=UTF-8">
- <title>Being Java Guys | Registration Form</title>
- </head>
- <body>
- <center>
-
- <div style="color: teal;font-size: 30px">Being Java Guys | Registration Form</div>
-
-
-
- <c:url var="userRegistration" value="saveUser.html"/>
- <form:form id="registerForm" modelAttribute="user" method="post" action="${userRegistration}">
- <table width="400px" height="150px">
- <tr>
- <td><form:label path="firstName">First Name</form:label></td>
- <td><form:input path="firstName"/></td>
- </tr>
- <tr>
- <td><form:label path="lastName">Last Name</form:label></td>
- <td><form:input path="lastName"/></td>
- </tr>
- <tr>
- <td><form:label path="gender">Gender</form:label></td>
- <td><form:radiobuttons path="gender" items="${model.gender}"/></td>
- </tr>
- <tr>
- <td><form:label path="city">City</form:label></td>
- <td><form:select path="city" items="${model.city}"></form:select></td>
- </tr>
- <tr><td></td><td>
- <input type="submit" value="Register" />
- </td></tr>
- </table>
- </form:form>
-
-
- <a href="userList.html" >Click Here to see User List</a>
- </center>
- </body>
- </html>
/WebContent/WEB-INF/view/UserDetails.jsp
- <%@ page language="java" contentType="text/html; charset=UTF-8"
- pageEncoding="UTF-8"%>
- <%@ taglib uri="http://java.sun.com/jsp/jstl/core" prefix="c"%>
- <!DOCTYPE html PUBLIC "-//W3C//DTD HTML 4.01 Transitional//EN" "http://www.w3.org/TR/html4/loose.dtd">
- <html>
- <head>
- <meta http-equiv="Content-Type" content="text/html; charset=UTF-8">
- <title>Being Java Guys | User Details</title>
- </head>
- <body>
- <center>
-
- <div style="color: teal;font-size: 30px">Being Java Guys | User Details</div>
-
-
-
- <c:if test="${!empty user}">
- <table border="1" bgcolor="black" width="600px">
- <tr style="background-color: teal;color: white;text-align: center;" height="40px">
- <td>User Id</td>
- <td>First Name</td>
- <td>Last Name</td>
- <td>Gender</td>
- <td>City</td>
- </tr>
- <c:forEach items="${user}" var="user">
- <tr style="background-color:white;color: black;text-align: center;" height="30px" >
- <td><c:out value="${user.id}"/></td>
- <td><c:out value="${user.firstName}"/></td>
- <td><c:out value="${user.lastName}"/></td>
- <td><c:out value="${user.gender}"/></td>
- <td><c:out value="${user.city}"/></td>
- </tr>
- </c:forEach>
- </table>
- </c:if>
-
-
- <a href="register.html" >Click Here to add new User</a>
- </center>
- </body>
- </html>
Here we are done with creating a simple hello world application using Spring and Hibernate. Just run your application on server, if everything went right you will see output something like these screens showing below.
In this blog we went through Spring, Hibernate Integration process and we get to know 'How to create a simple hello world applicaton is springa and hibernate using annotations'. In upcoming blogs we will dive into some others tutorials using spring and hibernate technologies.